How to Export Exchange Mailbox to PST?


Here we will tell you how to export Exchange Mailbox to PST file. Microsoft Exchange saves emails, contacts, calendars, and other information on a server, which makes it suitable for corporate use. Yet, sometimes users want to store their mailbox information locally. A PST (Personal Storage Table) file is the format used by Microsoft Outlook to save emails and other mailbox content on a PC. The process to save Exchange Mailbox to PST file facilitates data backup, archiving, and migration. It also provides email access even without an Exchange server. Let’s discuss how to convert Exchange Mailbox to PST file using the best methods.
Why Save Exchange Mailbox to PST File?
Following are a few reasons to export Exchange Mailbox to PST:
- Backup Purpose: Safeguard critical emails against accidental loss or server crashes.
- Storage Management: Releases space on the Exchange Server by storing old emails.
- Migration Needs: Assist in moving mailbox data to a different Exchange Server or Outlook.
- Legal & Compliance: Serves as evidence for audits or legal investigations by storing emails.
- Simple Access: PST files are accessible in Outlook without the requirement of an Exchange Server.
How to Export Exchange Mailbox to PST File?
In this guide, we have detailed a step-by-step procedure to export Exchange 2010 mailbox to PST. We have mentioned the prerequisites and given various methods, including Exchange Admin Center (EAC) for ease of use and Exchange Management Shell (EMS) for advanced filtering.
Prerequisites to Convert Exchange Mailbox to PST File
1. Assign Permissions to the User Account
By default, not even the admin has permission to export Exchange Mailbox to PST. You must add the Mailbox Import/Export role to the user.
Assigning Permission using Exchange Admin Center (EAC):
- Open Exchange Admin Center (EAC) and sign in.
- Click on Permissions > Admin roles.
- Click the Add (+) button and add a new role.
- Assign Mailbox Import/Export to the new role.
- Add the user who requires permission to save Exchange Mailbox to PST file.
Assigning Permission via Exchange Management Shell (EMS):
- Open PowerShell.
- Run the following command:
New-ManagementRoleAssignment –Role "Mailbox Import Export" –User ""
2. Set Up UNC File Path to Save Exported PST Files
As you cannot export to a local folder directly (e.g., C:\PSTExports), you must create a shared folder (UNC Path).
Here are the steps to Create a UNC Path and export Exchange Mailbox to PST:
- Make a new folder (e.g., PSTExports) on your Exchange server.
- Right-click the folder and choose Give access to > Specific People.
- Choose Everyone (not recommended) or your username (recommended). Click Add.
- Choose Read/Write permissions and click Share.
- Copy the shared network path, e.g.,
\\exsrv\d$\pst.
Also Read: How to Migrate IceWarp to Exchange Server?
Method 1: Using Exchange Admin Center (EAC)
This is an easy method to export Exchange Mailbox to PST but with some drawbacks, including no filtering possibilities and a lack of an option to review progress.
- Login to Exchange Admin Center (EAC) as the administrator.
- Navigate to Recipients > Mailboxes, then More options (three dots).
- Choose Export to a PST file.
- Choose the mailbox to export. Have a choice of:
- Export the entire mailbox
- Export only the archive mailbox
- Enter the UNC file path (e.g.,
\\exsrv\d$\pst\Mailbox.pst). Click Next.
- Select a user to receive an email notification when the process is complete.
- Click Finish to start the export.
Method 2: Using Exchange Management Shell (EMS)
With PowerShell, more flexibility is available to export Exchange Mailbox to PST, such as filtering by folder and mailbox items.
1. Export a Single Mailbox to PST:
New-MailboxExportRequest –Mailbox testdummy –FilePath \\exsrv\d$\pst\TestDummy.pst
This will export the entire mailbox of testdummy to TestDummy.pst.
2. Export a Specific Folder (e.g., Inbox) to PST:
New-MailboxExportRequest –Mailbox testdummy –FilePath \\exsrv\d$\pst\TestDummy.pst -IncludeFolders “#Inbox#”
Export will be done for only the Inbox folder.
3. Skip a Folder (i.e., Deleted Items) in PST Export:
New-MailboxExportRequest –Mailbox testdummy –FilePath \\exsrv\d$\pst\TestDummy.pst -ExcludeFolders “#DeletedItems#”
The Deleted Items folder will not be included in the PST file to export Exchange 365 Mailbox to PST.
4. Exclude Multiple Folders (e.g., Deleted Items & Spam):
New-MailboxExportRequest –Mailbox testdummy –FilePath \\exsrv\d$\pst\TestDummy.pst -ExcludeFolders “#DeletedItems#”, “#Spam#”
Limitations of Manual Methods
- Users cannot export specific mailbox content.
- Unable to track the export progress.
- Cannot export public folders.
- Requires technical expertise to save Exchange Mailbox to PST file.
- Requires complex commands to filter data.
- High chances of errors if commands are incorrect.
- Cannot export disconnected or corrupt mailboxes.
- Performance issues for large mailboxes.
Also Read: How to Migrate Apple Mail to Office 365?
Method 3: Advanced Solution to Export Mailboxes From to PST
The Email Backup Wizard is a robust utility to export Exchange Mailbox to PST with ease. It offers an easy-to-use interface and high-end features to back up multiple Exchange mailboxes or backup Office 365 mailboxes securely. In comparison to manual processes, the tool guarantees error-free and seamless export without PowerShell commands or admin privileges. It supports selective folder backup, preserves email metadata, and enables scheduled backups for automated exports. With support for different Exchange Server versions, the software streamlines mailbox migration and disaster recovery, which makes it the perfect solution for IT administrators and companies looking for a trustworthy Exchange mailbox backup.
How to Export Exchange Mailbox to PST?
- Start the tool on your computer and select Exchange Server from the Email Source.
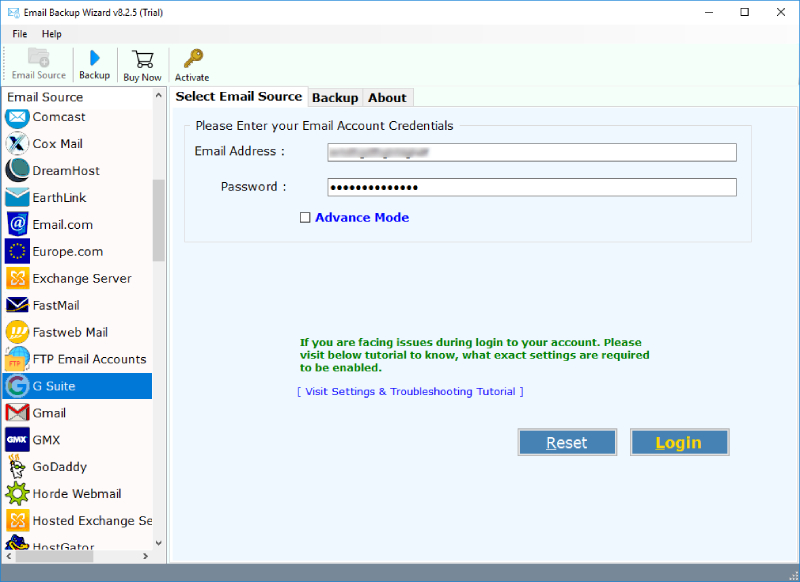
- Enter your Exchange account login credentials and click on the Login button.
- You can also use the “Use Batch Mode” option to export mailboxes from multiple Exchange accounts to PST.
- Now select the required folders from your Exchange mailboxes.

- Open the list of Saving options and select PST format.

- Finally, Hit the Backup button and start exporting the Exchange Server to PST.

Why Choose Exchange Mailbox to PST Tool?
- One can easily convert Exchange Mailbox to PST file as the software asks for only Exchange credentials.
- The tool allows you to easily save Exchange Mailbox to PST file which can be easily imported into any version of Exchange Server.
- It allows you to browse the required destination path to save the exported Exchange Server mailboxes as per the need.
- During the installation, the application allows you to change the default language as per your requirements to download Exchange Mailboxes to PST.
- There are no file size limitations to export Exchange Mailbox to PST without losing information.
- For just performing the migration process, the tool does not require the installation of the Microsoft Outlook application.
- While exporting the tool always preserves all the database such as emails, attachments, contacts, calendars, etc.
- The software to export Exchange 2010 mailbox to PST, also has a separate option “I am Admin”. Using this option, one can easily backup Exchange database directly.
Conclusion
In the given article, we have explained several methods to export Exchange Mailbox to PST such as manual ways like Exchange Admin Center (EAC) and Exchange Management Shell (EMS). Although these can be helpful, they have constraints like complexity, no progress bar, and the chance of errors to save Exchange Mailbox to PST file. To address these challenges, using a professional tool is an intelligent option. It eases the process, allows for selective backup, and maintains data integrity. The tool allows for saving space facility by creating a backup. So, try the application to securely export Exchange 365 mailbox to PST format in bulk.
Read More: How to Export Email to PST?